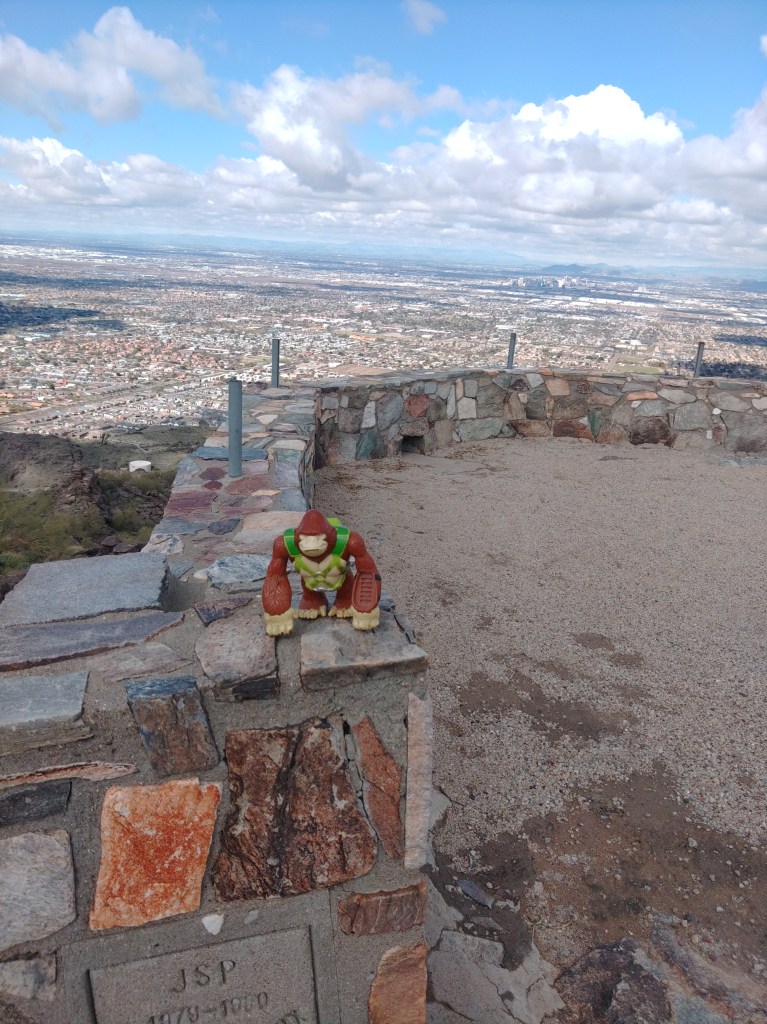
I can’t call it the Lost Lookout, as cool as that sounds, because you can see it from the street.
Bongo found the lookout.
As I stare at the Phoenix South Mountain Preserve, the ridgetop immediately east of Dobbins Lookout also has a stone structure upon it that I can see from my house. As a side-quest to the Holbert Trail I decided to seek it out.
To reach it, I followed the Holbert Trail south and up, past the Dobbin’s Lookout connector, and up to Buena Vista Road. I then followed the actual road east for a few hundred yards. Before you get to the junction with TV road, you will encounter a guard rail on the north side of a gentle curve across a relatively level ridgetop. This is not necessarily to keep careless drivers on the road. This is to keep curious drivers off the remnant road running north of here.
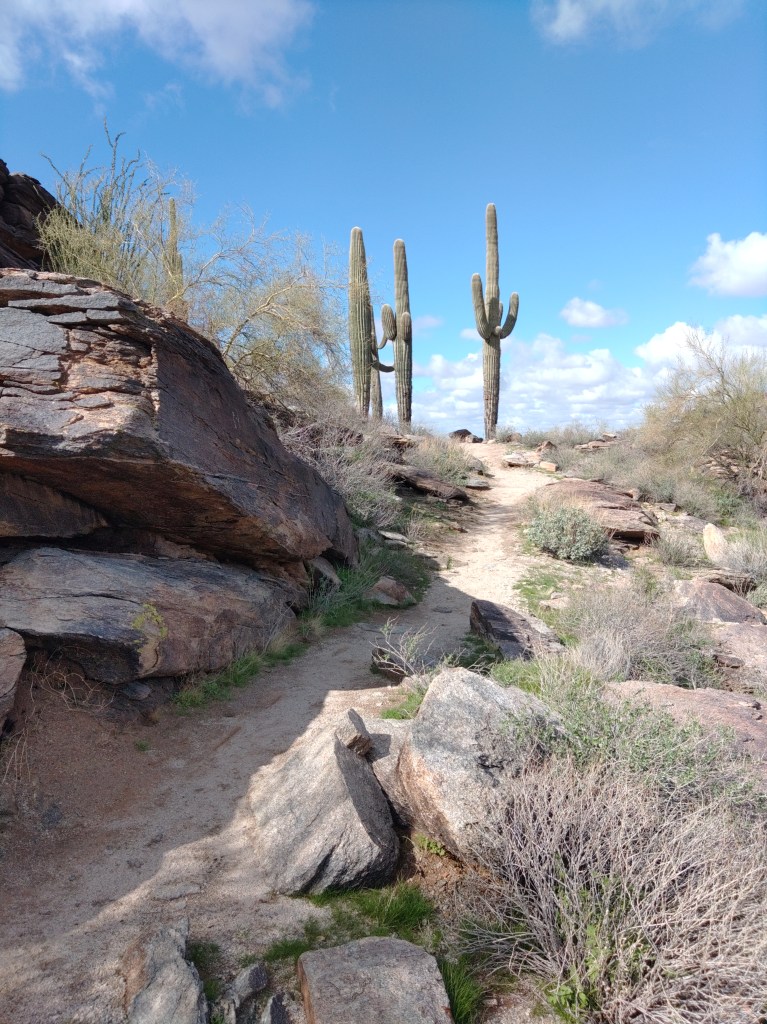
Well, I’m a pedestrian. So I went around the rail and south along what was vaguely a remnant road flanked by small palo-verde trees and young saguaros. The oldest of the saguaros guards the destination about a half-mile from the road, but you’ll see the big double-hoodoo first.
Approach from the road.
The remnant road climbs the hill, past the hoodoo to empty into what was clearly a vehicular parking/overlook with space for maybe 10 cars.
Panoramic view
The topo map has the elevation at 2246’ above sea level.
I believe, based on inferences, but not direct references, in old city planning docs, that this was called Holbert Overlook. The concrete stamp on the west side declares it was built by JSP in 1979-80 for the City of Phoenix. Its is referenced in the 1989 city master plan for the preserve.
D3 – The North Overlook area near the Summit of the Gila-Guadalupe Range. Containing Holbert and Dobbins Lookouts, with access to Buena Vista and Gila Overlooks, this sub-zone will continue to receive large numbers of visitors. Overlook sacrifice zones should be defined and edged with compatible barrier treatments.
Or abandoned and forgotten apparently. It does not appear on the 2007 trail map, or any map afterwards.
The road, though, appears on the 1952 USGS topo map.
All searches for Holbert Lookout will produce results for the trail. The lookout was abandoned before the internet was useful, so sometime in the 1990’s. I’ll update this article if I find an answer to that.
Meanwhile, I had the place nearly to myself. The other guy was also making a video, though in Spanish. He climbed the hoodoo. I did not. But I enjoyed the view until the rest of my hike called me away.
When you have friends or relations in from out-of-town and they say that they want to hike up South Mountain – and you are satisfied that they understand what “hike” and “up” really mean in this context – you want Holbert Trail.
One of several park things named for Charles M Holbert, the first custodian of South Mountain Preserve from 1929 to 1939. It is said that there was no place in the preserve that he had not visited.
The official trailhead of Holbert is now in the giant parking lot near the Central Avenue entrance. Where exactly, in the giant lot depends on where they are in reconstructing the group picnic site.
The two and half miles of Holbert Trail can be roughly divided into four sections. The first section starts in the giant parking lot, wandering east across the north base of the mountains, skirting a couple of retention basins. You can find some petroglyphs in the early going. This is where you take out-of-towners who clearly do not grasp “hike” or “up” in this context, and you do not want to hear them whine. Meaning this portion is super-easy, and totally skippable.
The second part can be easily reached by the 7th Street or Mineral Road trailhead. This is no longer an official trailhead on city maps, but the dead-end of Mineral Road heading east from the southern terminus of 7th Street is very much used as a trailhead. Both the footpath on the west side and the access road on the east side will lead you to signed junctions with Holbert Trail.
This is also the entrance for Mystery Castle – should that attraction ever manage to open its gates again.
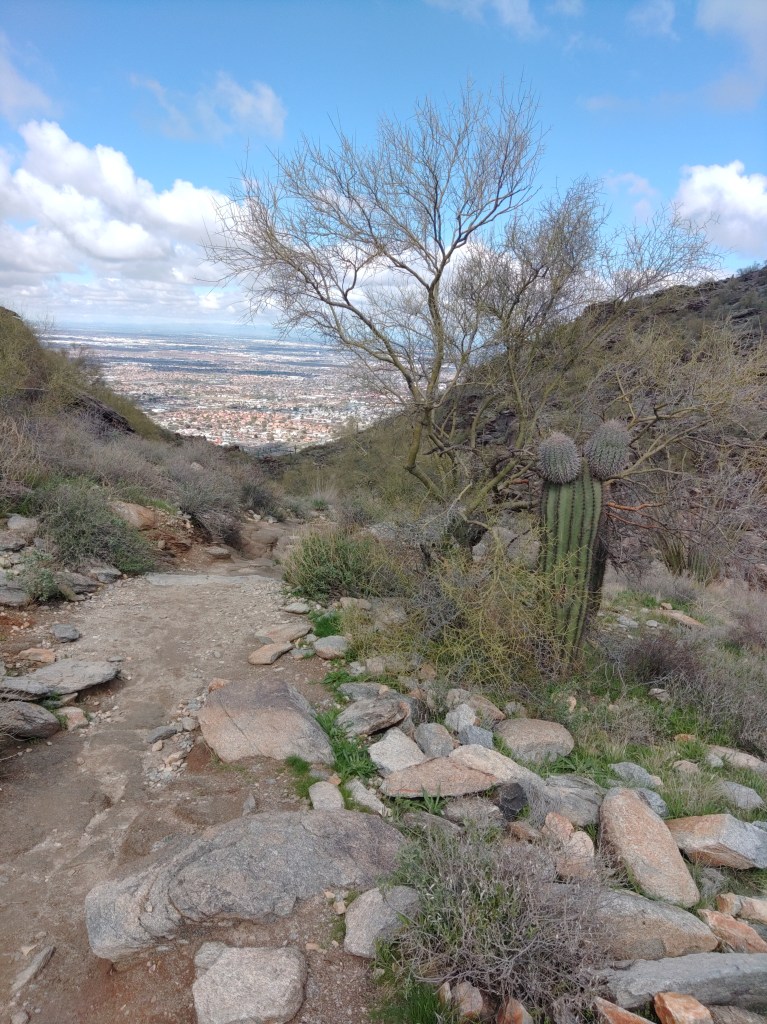
Past the second water tank, Holbert starts its second section, a sustained, winding climb up and across two ridges and then up a narrowing canyon lined with blackened basalt. Every time you can bring your gaze up from the constant rock-stairs on the trail you will see the desert slopes of the mountains spreading before you. Stop and turn around and you will witness the whole of the Phoenix metro stretching off into the horizon.
So, this hike is best done on a clear day. Otherwise, you will see the bowl of haze you hiked out of, realize that you actually live in that, and struggle with sadness. But on a clear day, this is awesome.
Poor place to plan a felony…
As this popular trail winds up the canyon, the voices of other hikers in the distance will echo around the steep walls. This is a poor place to plan a felony with your friends.
Just past what would be a waterfall, for the seven hours a year this canyon has running water, you will encounter the junction with the Dobbins Lookout Access Trail. At this point you’ve climbed 500 feet up in just over a half mile – which is why you’re feeling it.
Most locals with out-of-towners in tow take the access road to Dobbins Lookout. Yeah – don’t tell them. Hearing your friends exclaim “We could have driven up here?” is a long and traditional source of great joy.
There are also vault toilets here – one of the few available outside of the developed picnic areas.
When I did this hike for photos, I cheated. I had a friend drop me off at Dobbins, then I went up Holbert, off to a side-quest, and then down.
Upper Holbert continues past the Dobbins junction, climbing the rest of the way out of the canyon before crossing Buena Vista Road. It keeps climbing over and then on top of the actual mountain. This portion is quieter, less crowded, slightly easier and more scenic than the portions that came before, and totally worth doing. In less than a half mile from Buena Vista Road, you will reach TV Road. Across that road – which goes to the antenna farm on the summit and the Gila Valley Lookout – is the terminus of the Holbert Trail as it T’s with the Maricopa or National Tail. You are at the 2.5 or 3 mile mark, depending on whether you went up to Dobbins, and have climbed at least 1200 feet from the trailhead to stand at 2400 feet above sea level.
The proximity of either Dobbins or Gila Valley lookouts make this a super-easy car shuttle. You could also take the National Trail west to the Kiwanis Trail and then Los Lomitas Trail to make a full loop of it. The loop would add a couple of hours.
The up and back described could be done in four hours, five if you dawdle. I mean – I suppose. I actually cheated.
Los Lomitas Trail in South Mountain Preserve is the connector trail between the middle of the developed picnic lands and the giant parking lot that separates the conference center from the group picnic grounds. It is the third and final leg of my South Mountain Infrastructure Loop.
For all that, this trail is worth doing on its own. Because this is part of the loop, we start in the middle of the park, and head towards the great lot where you likely left your car.
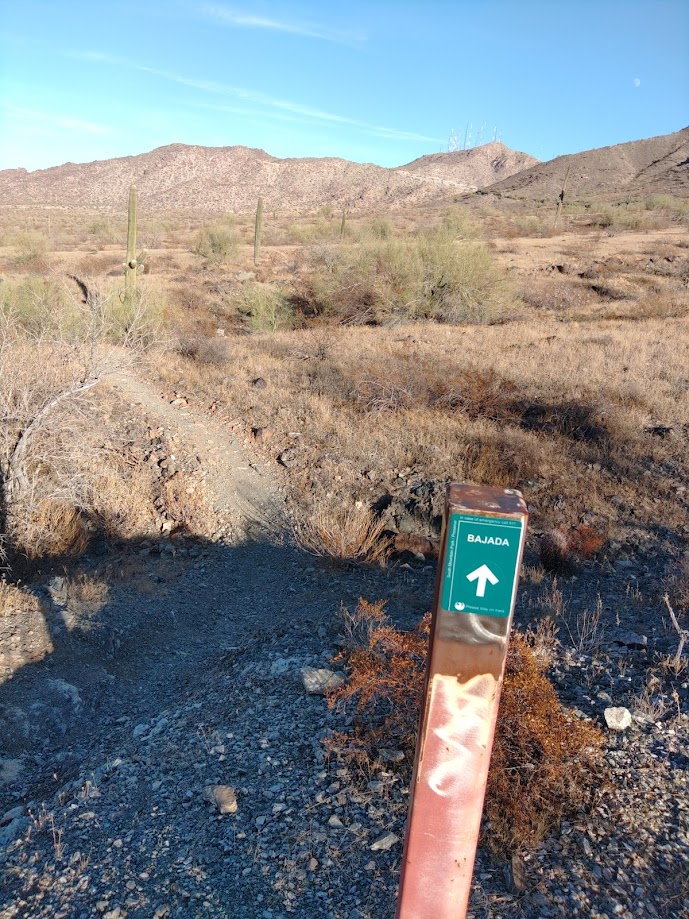
We start at the four-way junction: The Bajada Trail goes south, up the slope. The Ranger trail continues north, towards the Five Tables Trailhead. The Derby Trail, which is oft signed as part of Los Lomitas, goes west to eventually join the Max Delta Trail, but the part we want, the main portion of Los Lomitas, heads east, before bending north.
East now, from the junction, Los Lomitas goes over low hill and shallow wash a few times before crossing some flat desert. On the far side of that, you reach Los Lomitas Cabanas, which were fenced off when I was there, but the restroom was open. By open, I mean unlocked. The gate door is closed and latched, presumably to keep the critters out of the garbage. Latch it back up behind you.
The trail follows ridgeline NE to the Kiwanis TH (and another RR), then parallels the road a spell before dropping into a large wash near the ramada compound of the Piedras Grandes picnic grounds.
Here, you trudge through sand, as opposed to the packed dirt of the trail that came before. In mid-day, the high walls of this wash present your only hope for shade. Los Lomitas climbs out of this wash to merge with Box Canyon Trail, a horse trench bending more north now. Soon, Box Canyon/Los Lomitas parallels the Judith Tunell accessible trail as it gradually bends from north to northeast before reaching the parking lot.
Where exactly in the parking lot depends upon where they are in the endless construction. This flat expanse of asphalt hides few secrets, and rarely more than a dozen cars. You’ll be fine.
This is the east section (about a third) of the trail, from its junction with the Los Lomitas Trail to the San Juan Bicycle Center and Sometime Parking Lot. Except I actually hiked it and describe it in the opposite direction.
The San Juan bike lot marks about a third of this trail’s overall length. For the rest of this trail and its’ journey west see the main trail description.
The Max Delta Trail T’s with the Bajada trail near the San Juan Bike Center. To the right, Bajada proceeds roughly southwest to the Alta trailhead deeper in the park. To the left, the section I wanted went roughly northeast, toward my car.
Most of this portion of the trail follows the mountainside just below Dobbins Lookout Road, so this is not a wilderness experience at all. But oh my – lookit the city out there to the north. The trail picks it way across the slope for about three-quarters of a mile before turning north and downwards. Soon, it will merge with the Ranger Trail. By this point, has widened into a service road.
Immediately to the west of that facility, Bajada will end at a four-way junction. The Ranger Trail continues straight/down/south towards the Five tables trailhead. The Derby Loop continues left/west until its junction with the middle portion of the Max Delta Trail.
Los Lomitas Trail goes to the right/east towards the Big Parking Lot. That is the way if you are following the Infrastructure Loop.
Max Delta is an entry level trail through the entrance of the preserve. It is named after the mine shaft that lies buried and officially off limits towards its southern terminus. That is another article. This is just about the trail.
From the trailhead at the entrance (across from Scorpion Gulch) the flat, wide trail winds west then south, narrowing as it climbs up the ridgeline it will follow for half its’ distance. Your first landmark is a monument and plaque commemorating the city elders who re-designated the park into a Phoenix South Mountain Preserve.
If you’re new here, Phoenix was founded by developers who eventually become old and rich philanthropic preservationists determined to protect the precious desert from the new wave of developers. Somewhere in the 1970’s, 1973 – by the plaque, the old developers city elders started designating the “park” as a “preserve”.
Litigation followed. But here it is, still more -or-less preserved.
Heading south, the trail intersects with the interpretive trail behind the old visitor’s center. This is one of the last of the original CCC buildings that still sees actual use. Looking out, you can easily see the new visitor center in the distance, and the work compound just across the street. The old administration building still has restrooms and water available to the public. The small ranger office and gift shop it once house have moved elsewhere.
The gunfire you hear from the far side of the ridge is not random. There is a gun range on the other side, both the private Phoenix Rod and Gun Club and the Phoenix Police training range. These have been here since 1948, when these slopes were still a “park”. They expanded somewhat contentiously in the 1990s, closing the trailhead on the terminus of 7th Ave at Olney.
They are not supposed to shoot hikers, even accidentally, even hikers off the trail, but the party investigating will be the one most likely to have shot you, so stay on this side of the ridge.
Climbing down from the ridge you cross low hills with patches of barrel cacti, then saguaro then teddy-bear cholla. The trail goes down into a wash and Y’s on the far side. Max Delta proceeds south, to your right. To the left, the trail crossing the road is the Derby Trail aka Los Lomitas. You can take that turn and shave a good 40% off the loop hike. But for now, we follow the Max Delta.
The dirt turns grey as the trail crosses the arroyo, finally a bit away from the road. You will cross another road, along with numerous washes, but it gives brief illusions of crossing open desert. Look for mine pits along the way.
The gates were closed at the San Juan Bike Hub, as this was not the first weekend of the month. It’s not closed to people, but certainly closed to vehicles. Even on the special weekend, it just affords closer parking to those who want to hike or bike down San Juan Road – which is another article. There are some amphitheater seats which were not shaded in the afternoon by the large metal canopy, a trash receptacle, and a good number of empty parking spaces for both bikes and cars. I was the only person there when I arrived, and took a break there, surrounded by this rust-colored monument to municipal expenditure.
Then I proceeded east down the Bajada Trail to continue on with the loop.
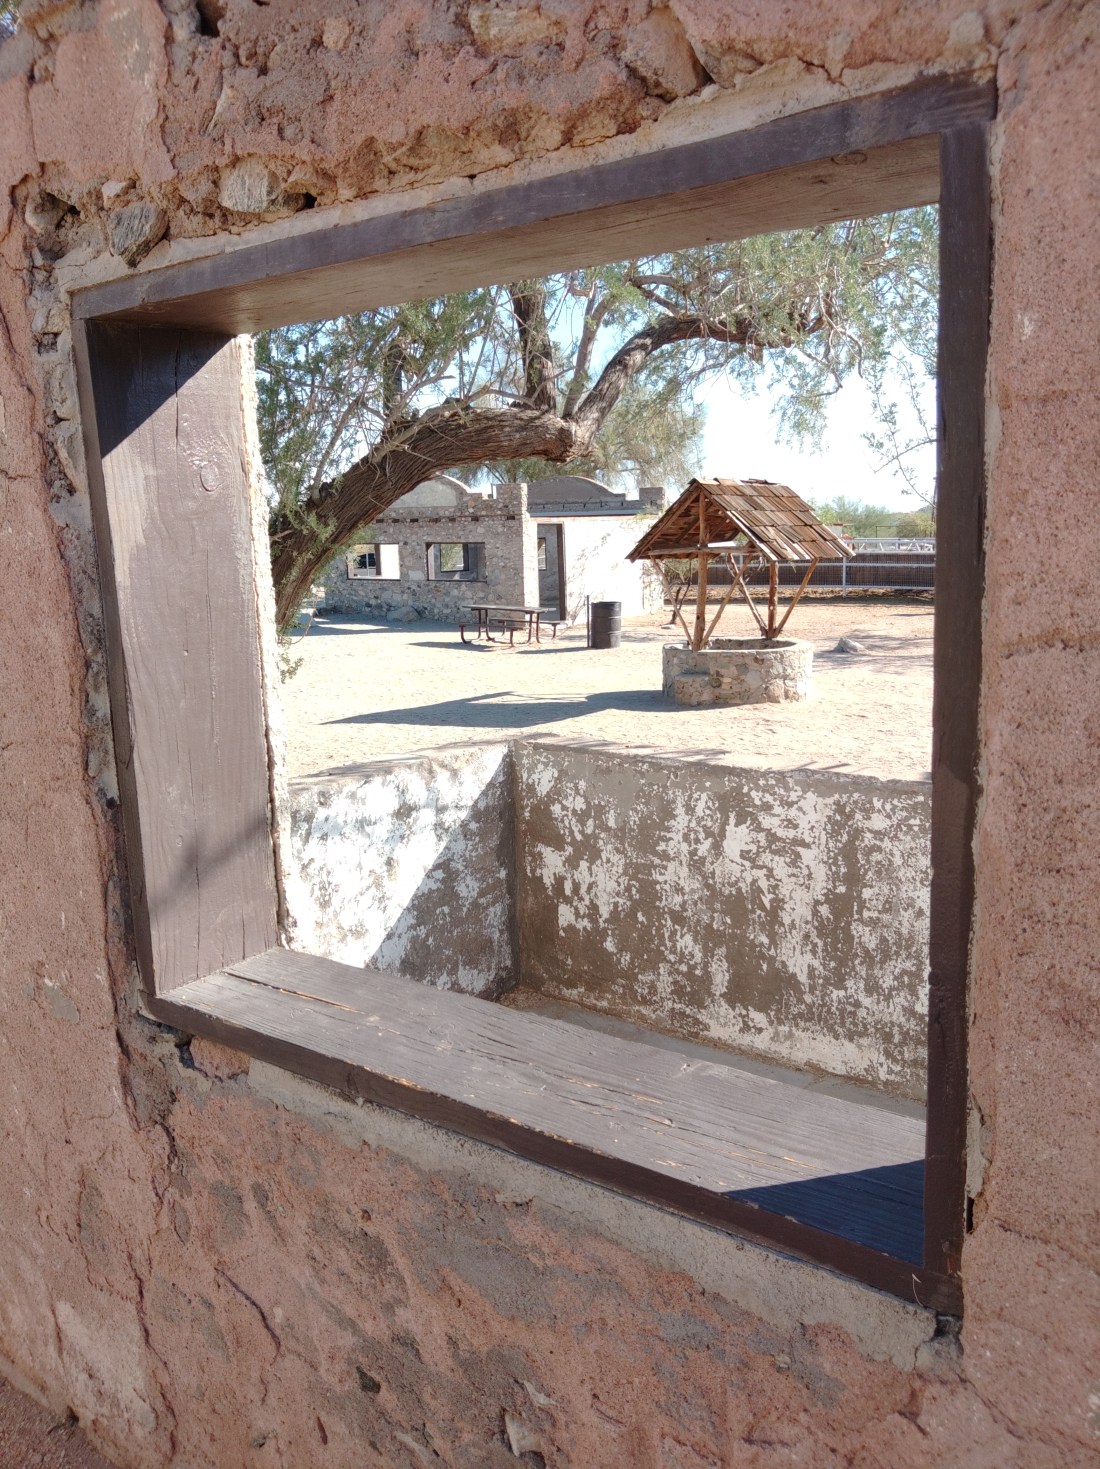
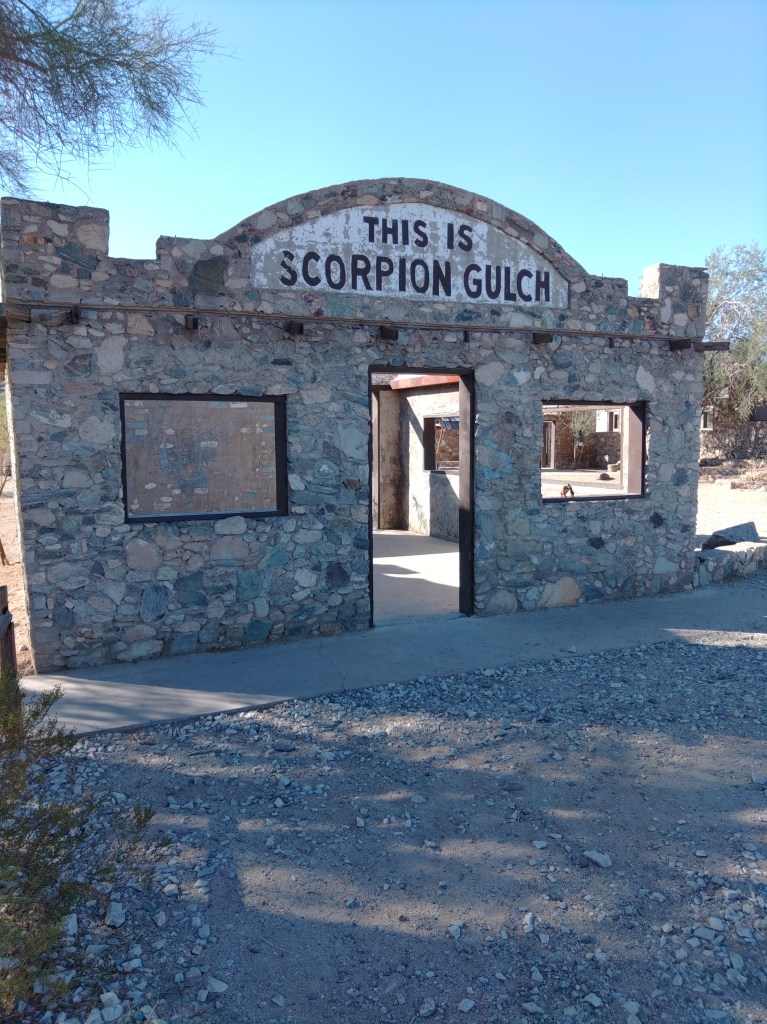
Near the main park entrance stand the stone remains of Scorpion Gulch. Visitors are free to wander in and around the two stone buildings and the dirt area between them. It is quite popular for photography, especially at sunset.
William Lundsford – Phoenix Gazette 1966
Scorpion Gulch was built as the home and the storefront of William Lundsford, who first came here with the CCC. Lundsford purchased 100 feet of frontage road in 1936 and built these structures with his own hands. For decades he ran a curio/gift/convenience store along with a cactus garden. According to an oft-quoted 1966 Phoenix Gazette article, the local kids (presumably of what was then the small town of Laveen) called him “Grandpa”.
While Lundsford claimed to have the copyright on “Scorpion Gulch” named for the prefusion of scorpions that could be found in the wash beyond, most of the early photographs show a sign saying South Mountain Trading Post. They also show it with a roof.
After Lundsford passed, the building was briefly a bar in the 1970’s, abandoned, and then became annexed into the park. The city “stabilized it” in 2012, removing what was left of the crumbling roof and adding some strategic concrete reinforcements.
This half-day hike combines three established trails and a bit of mild bushwhacking to make a circuit of the south-central portion of the park, where most of the development is located. As described, the circuit takes the Max Delta Trail south and west to its junction with the Bajada Trail. Taking the Bajada east we turn north to it terminus with the Ranger Trail, then shortly its junction with the Los Lomitas Trail. We take the Los Lomitas east and then north again, where it merges with Box Canyon Trail, to dump into the parking lot, completing the circui
I parked in the expansive Environmental Center/Ranger Station /Event parking lot and then bushwhacked roughly north, across the big wash to Scorpion Gulch, then across the street to the Max Delta trailhead proper. It is not hard. Many have done this before you, but it is not an official route.
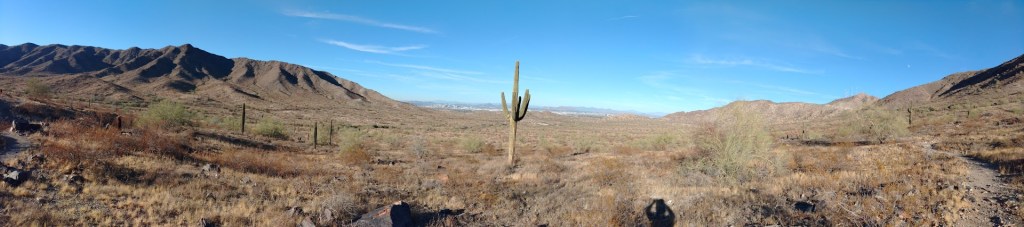
Panoramic view from the Bajada Trail
All three of these hikes are moderate and easy to access. Moderate means you can do these in tennis shoes, but not sandals. They are not, as the name suggests, quality wilderness experiences. It is more of a walking tour of the municipal portion of the park. You can take non-hiker-hikers on it, and see some desert, and never be more than an hour from rescue and two hours from some sort of toilet.
Max Delta across 2.2 miles, will take you along the entrance road, past the old park HQ, then south across a short stretch of open desert to the San Juan Bike Center.
Bajada Trail, at least this mile of it, heads east, following the mountainside below Telegraph Pass Road before turning south to connect with the Ranger trail, and then the junction with Los Lomitas.
Las Lomitas, over the roughly 2.5 miles, winds through the various ramada compounds before merging with Box Canyon trail and dumping out alongside the accessible trail to the parking lot.
That’s just under six miles total. I did it in four hours hike time, while taking notes and pictures.
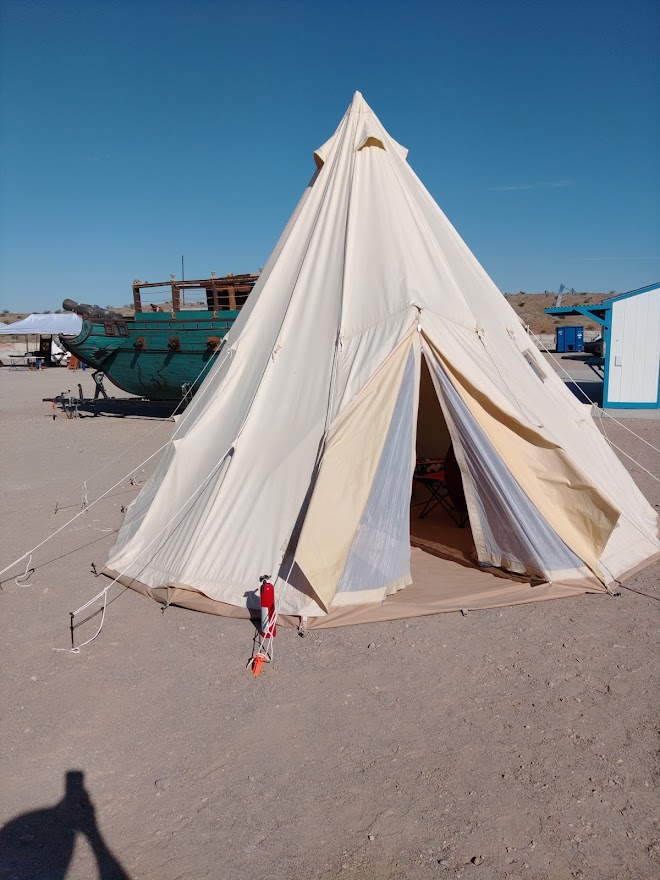
In my personal blog, [What Have We Learned?] I have intermittently chronicled our acquisition of the Danchel 6m Bell tent. [Here, then here]This was in error. We have no such tent.
Not our tent – at all.
In our defense, when we acquired this thing, it had no documentation, and no poles. Just the tent fabric and a storage bag. And it was already several years old.
What we have turns out to be a Danchel 5.5m Teepee tent. We learned this setting up at a Renaissance festival (as we do) and our neighbor recognized the contraption.
Danchel does not seem to sell this style anymore, certainly not in the US market. They may be available in Asia, as “Indian tents”, which could refer to the type of canvas used rather than the style. These were old websites, though.
It is not actually a teepee in the sense of the traditional native American tents. Those would have several poles spread out along a circle and then brought together at the top to form the iconic cone shape. [Notes from the Frontier has a good write-up].
My tent has a single pole in the middle. It’s the second one I bought for it, and it’s still too short, being specific to the Danchel Bell tent. I don’t believe I could reliably purchase the proper pole, nor do I want to sink any more money in this, so I adapted.
Pardon the mess.
Before I learned that the pole was simply too short, I went around in many circles trying to conjure a method of removing the droop from the sides.
None of them worked.
Wrong.Also wrong. Close but still wrong.
Because the pole was too short.
The answer is actually easy – both sets of loops can make to a guy stake that I try to place about three feet out. I have found that in good weather, I only need to make the top row.
This revelation also explained why I could never find the loops and holes for the doorway frame that is a feature of Bell tents. Yes – I bought one of those as well. The teepee has no holes or loops for the A-frame it does not need.
So I have an A-frame for a 6m Danchel Bell tent in my garage, and if you need it contact me. It’s yours for cost of shipping.
I also still have those stupid wooden stakes, but I will find a use for them.
Like their bell tent, the Danchel teepee features a zippered-in heavy-duty bathtub floor. Currently, all of that zip hardware still works. The floor can be completely removed if you want.
In the Bell tents, it is possible to hike up the walls a couple of feet to provide a more ventilated shade structure. The teepee does not have those means, though it could likely be done by just roiling up the side sections and clipping them.
We haven’t tried. At fair, it is both dressing room and sleeping quarters.
It comes with a flap for your stove vent, but we have sewn over that burn-damaged flap. We do not camp in the snow.
Now that we’re done with what not to do, here are some best practices I can recommend.
You really, really have to dry this thing – somehow – before storage. You do not want to store it wet for any longer than it takes to drive to someplace sunny and open.
I use the 12” heavy duty tent stakes, the ones that look like giant nails. Anything less will frustrate you when you are trying to convert the dirt parking lot of a rodeo ground into a renaissance market. I can usually get them in and out with a straight claw hammer, but I carry both a 8lbg sledge and a 3’ crowbar, and have used both on occasion.
It is also well to have something bright to wrap around your guy stakes, as they are trip hazards even in the sober daylight. I use a pair of bright orange ratchet straps. I also use a ratchet strap instead of a guy line for the loop over the doorway. This is a hangover from when I tried to incorporate an A-frame, but it is also more stumble resistant.
Here’s the video I did not put on You-Tube about inserting the pole.
This goes for any tall pole in a tent.
I use an 8” wooden apple-box to prop up the bottom of the pole. It is the stand where the water bottle and toilet paper (two things you should always have in a sleeping tent) always return to.
The last time I kept track it went up in 90 minutes and went down in 50. Yes – I got it back into the bag – dry.
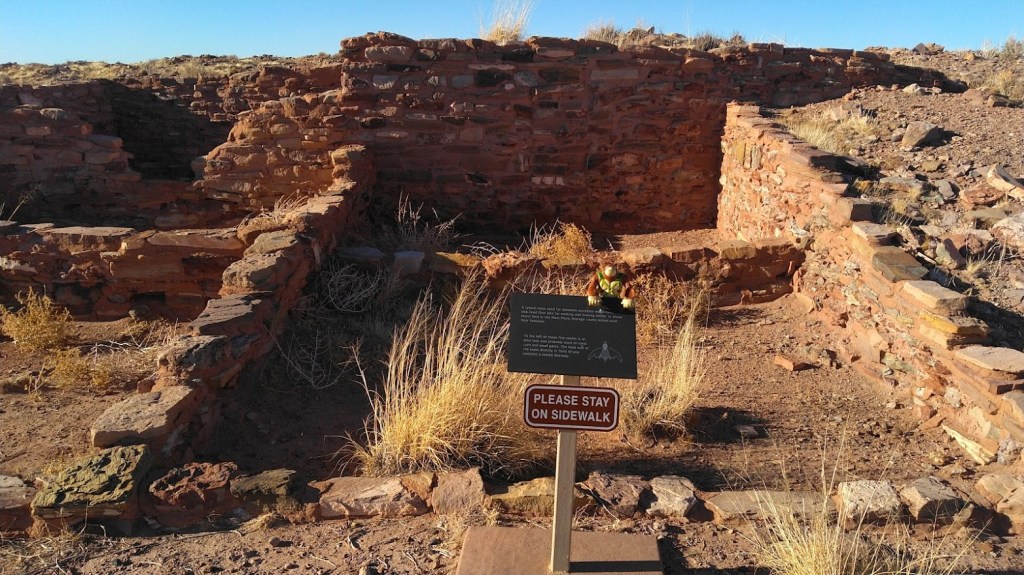
Before I get into this article about the ruined houses of native Americans, let me confess, for context, that I have long been bored with the subject. As a native (meaning born in Phoenix – not Native) and thereby a product of Arizona public education through the 1970’s, I joined my classmates as we were herded by busloads through the various ruins scattered around a two hour drive from metro Phoenix.
These are not hard as day trips go, and low-hanging fruit for educators: here are their mud and stone structures or pit houses – and they all used to live here and did things – some of which we know, the rest we guess about – and then they all disappeared – before white man arrived (they always add that) – and now we can look at their old houses from a respectful distance.
Just like the last ones we visited, only they are over here, and look like this. If the nerds in class are bored with this (and I was a poster-quality nerd), all of the kids are bored with this.
Consequently, as an adult, I swore off Native American ruins as a destination.
This lasted until I had kids and started dabbling in travel writing.
Another thing these places have in common is visitor centers with maps and bathrooms.
Bongo at the Homolovi AZ state park visitor center
I arrived at the visitor center at Homolovi State Park at 4pm – an hour before they closed their gates. The ranger their took my $7 entry fee, and said I probably had time to see the main ruins: Homolovi II at the end of a road winding through the dry prairie for about two miles north of the visitor’s center.
Of the five known sites, only two are open to visitors. Homlovi II is the larger of the two. Homolovi I is close to the campground – yes people camp here – all year. It’s $20/night for most spots. The campground has restrooms, and even showers, but, like the rest of this ecozone, zero shade.
I saw RV’s scattered across it in early February. I don’t know why.
The state park is a joint effort with the Hopi Tribe, whose reservation lies about 60 miles north of here, in the middle of the sprawling Navajo reservation. Neither tribe thought this was a good idea, and the Feds didn’t care. Thick books have been written on how this happened and why its stupid. I don’t have time to get into that here – but this guy took the time, if you care.
The Hopi people of today still consider Homolovi, as well as other precolumbian sites in the southwest, to be part of their homeland. They continue to make pilgrimages to these sites, renewing the ties of the people with the land. The Hopi tell us that the broken pottery and stones are now part of the land and are the trail the Bahana will follow when he returns. Therefore, these are mute reminders that the Hopi continue to follow the true Hopi way and the instructions of Masau’u.
The website does not go on to explain who or what the Bahana is, and while we can guess by context, it does not expand on the concept of Masau’u. None of which is surprising.
The Hopi Tribe is notoriously insular. They allow visitors to their reservation, but only in the approved hotel, and you cannot wander around, and not only is photograph prohibited, but note-taking is prohibited.
I think in 7th grade a public school teacher told us that every year evangelical Christians would send Christmas gifts to the Hopi reservation, and every year the Hopis would, “toss them over the cliff”. I don’t know if that still happens, or for a fact if that ever happened, but it sounds plausible that it happened at least once. I’m pretty confident, though, that you can replace the cliff part with a dumpster of some sort.
So those guys – those guys – partnered with white man (then Governor Bruce Babbit in particular) to preserve the dwindling remains of these sites, as pot hunters were starting to come in with construction equipment.
And having driven that road and walked along the couple hundred yards of sidewalk to and around Homolovi II I can report that those ruins are – unimpressive. A couple of small dwellings and one large ceremonial structure have been excavated so you can take pictures (that was part of the deal) and learn that they – favored rectangles.
Rectangles!
Full disclosure: I did not have the time to go through the interpretation displays in the visitor center – which take up slightly more space than the gift shop portion, nor did I download or otherwise listen to the interpretive audio feature.
As much as I claim disinterest, I did do some reading.
Somewhere in the 1200’s flooding along the Little Colorado (which marks, roughly, the western boundary of the park) deposited big piles of driftwood. Ancestral Hopi (I’m using a consensus term that is also easiest to spell) migrated out from the Mesas and used that driftwood for building and burning, establishing several villages along the river. They grew cotton and other crops in the alluvial soil until sustained drought in the 1300’s drove them back to the Mesas.
That same drought did in a lot of cultures around the southwest. I learned that in the 70’s.
Ancestral Hopi took the trouble to destroy their homes, particularly ceremonial sites, as they abandoned them. Vandals and looters also did their share of damage. Unlike the towering ruins at say Wupatki or Walnut Canyon, all the average eye will see is a pile of rubble of what was once a sizeable complex of structures. Except for the small portion the state park excavated so I could pose my plastic gorilla in front of them and take pictures.
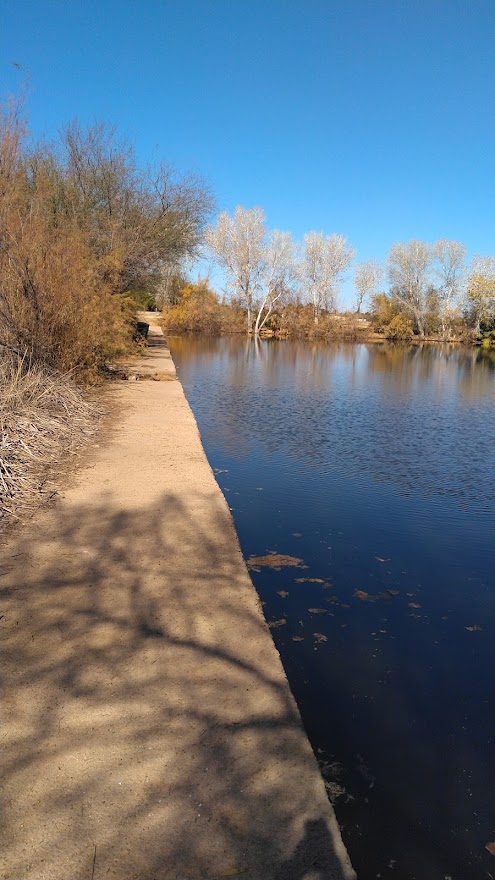
The sidewalk to peace and quiet
I do not have Hopi ancestors to commune with. In fact, I have very little spiritual awareness – I don’t feel Vortexes around Sedona or any of that. I believe the spirit world is like the New Jersey mob: not a player, not a target. This buddhist has enough complications in his life.
I did feel the abiding peace that comes with those barren, rust-colored hilltops – near silent save for the wind. That may be typical of the whole region, but I paid my $7 – so I could feel this without trespassing.
Micah Loma’ovaya, an archeology student working on the site wrote this in Southwest Archeology in the Fall 2000 issue:
“Going home on the weekends allowed me to recount for my grandparents and other relatives our weekly discoveries. Many parallels between Homol’ovi and Hopi were found, and my learning expanded, not only in archaeology, but in my own culture as well. It seems that as Hopi have progressed along our cultural continuum, we have tended to lose focus of the true meanings behind our behavior. […]
“In Hopi culture, we understand that ancestral places were marked with footprints (ruins, artifacts, and burials), monuments to our prehistoric occupation, that would be attributed to us one day. Now we must participate in retracing those steps leading to Hopi society and be willing to acknowledge the fact that we have a history to share.”
Micah Loma’ovaya Archeology Southwest, Fall 2000 pg 10.
I’ll leave on that, before the ranger closes the gate.
[Micah Loma’ovaya has gone on to become an archeologist and apparently a realtor. His Linked-in bio.]
Homolovi State Park is located just north of I-40 and Winslow on AZ 87.
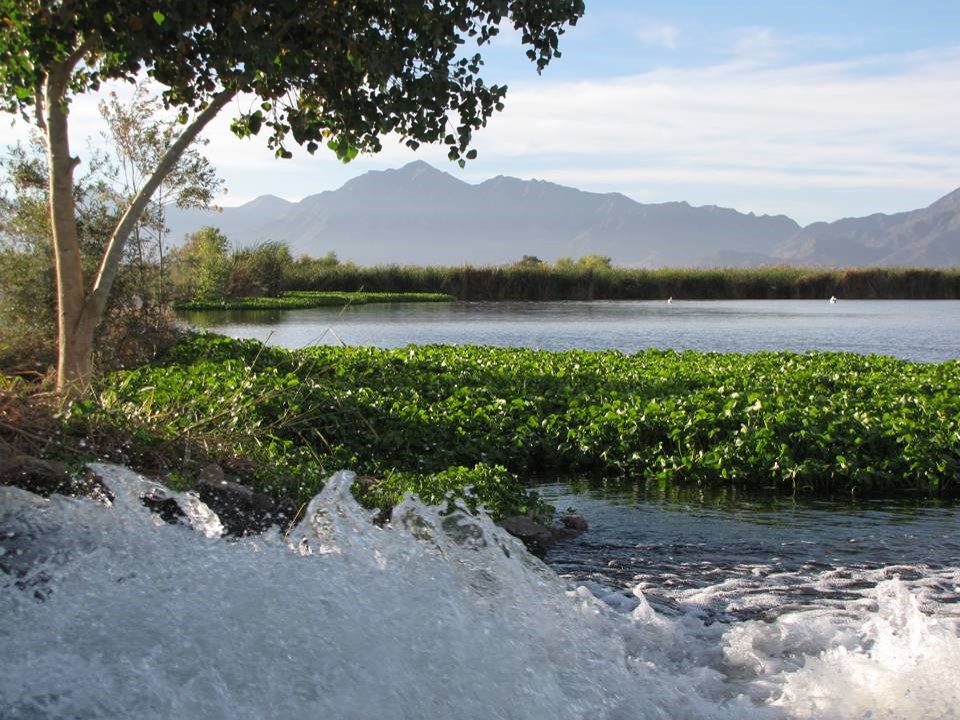
Tres Rios Wetlands Environmental Restoration Project is the outflow from the city of Phoenix water treatment facility that they have made into a public park. No – the water’s fine. It’s already treated before you can get anywhere near it. They won’t let you swim in it, but they will let you walk around (with a free permit) and fish (with a paid permit).
One path through here is a segment of both the Sun Circle Trail, a bike route that runs around most of the cities in the metro area and the Maricopa trail, which circumnavigates the entire metro area. [They have an interactive map!} Also, it is a local hike, and the day (30 Jan 2022) was great for local hiking.
My route would start at Tres Rios, then follow the trail past it, westwards along the Salt Riverbed to its confluence with the Gila river, near the Base and Meridian Wildlife Area. I would return the way I came.
Tres Rios has a gravel parking area, a single plastic outhouse, interpretive signage and large trashcans. There are no other services. The large trashcans represent a futile attempt to keep fisherfolk from leaving their fishing garbage all over their fishing place.
The lush and scenic Tres Rios is now home to more than 150 different species of birds and animals like muskrats, raccoons, skunks, coyotes, bobcats, and beavers. The beautiful cottonwood groves, willows, mesquites, and other desert shrubs around the reed-lined ponds and along the trail attract many migratory and wintering songbirds. By bringing the Salt River back to the condition it was in during the early 1800s, this project is repairing a natural habitat.
The reclaimed water from the wastewater treatment plant is pumped over to the wetlands, and the plants and animals take what they need before it is discharged back into the river.
Like the 1800’s only now, and with more plastic trash
From the parking lot, three trails (wide graded dirt roads really) proceed westward in parallel. The center one, with the signs, if the official course of the Maricopa Trail. It also seemed the most crowded in the late morning, but also had the better of what scenery there was. To the north are the lagoons, and to the left, after the first half mile, is the mesquite bosque. The trail also passes the “waterfall” where the lagoons discharge into the Salt Riverbed.
The north track has those same lagoons to its south, and open farm fields to its north.
The south track had brush to the north and the normally dry portion of the Salt River to the south. It also features zero shade.
I had dutifully applied for my permit, and had it ready to show on my phone, but there was no evidence that anyone enforces that. All the numerous “No Trespassing” signs about the place – that means people without permits. Or visiting after dark- park hours are dusk/dawn.
Several concrete causeways separate the various lagoons, and these can be crossed on foot. I’m not sure if you are supposed to, but fisherfolk clearly do this all the time. But beware, At least two spillways on each causeway guarantee a water hazard.
Past the lagoons, the north and center roads converge, ending in a turn-around marked by giant concrete pipes. To the north of these pipes, the Maricopa trail continues, intermittently following the remnant rod, or making its way as a dedicated footpath.
I dutifully followed the marked trail on my way in as it hugged the great wall of caged rock that marks the northern edge of the Salt’s flood-zone. I followed a series of dirt roads on my way back and found that I did not miss the trail at all.
The trail closes in on the riverbank just as you reach the boundaries of Base and Meridian Wildlife Area. B&M is primarily a fishing spot. It shares parking with the Phoenix International Raceway. From that parking lot, a bridge crosses a wash to land onto a paved road bisecting the riverbed. From this road all manner of dirt roads and trails fan out to various fishing spots.
Due south of the parking lot is monument hill, where the geo-marker forming the basis for the state’s survey lines is located. Alas, it is also possible to glimpse into the raceway from that height, so the hill is now fenced off. It’s not much of a fence, but you would be on your own with that. I tossed the garbage I had collected on the trail into the trashcans provided at the trailhead and turned back.
I found the actual confluence, where the Gila, maybe ten feet across at that point, burbles into the Salt, fattened to hundreds of yards across by the Tres Rios discharge.
One of the dirt roads bisects an island in the middle of what would not be the Gila River, and I was able to sit quietly on the bank and listen to one fisherfolks Tejano music battle with another’s rap music battle with oldie-rock being covered by whatever band was playing whatever even went on at the raceway.
Remember that you are, at either trailhead, walking distance from a convenience store. This will not be a wilderness experience.
Even so, I did find some measure of peace and quiet. On my return, following the dirt roads closer to the river, I encountered nobody for the better part of a mile, and was able to even sit by the river in peaceful reflection, doctoring a blister. That moment alone kinda made the trip worth it.
I did not bother to GPS this, but ten miles round trip feels right. You could probably do it in eight miles if you did not wander. I was on the trail about five hours.